Recap of the last blog
Before we move on, it’s important what we covered in the last blog. We’ll be going forward from loading Custom Dataset to now using the dataset to train our VGG-16 Network. Previously, we were able to load our custom dataset using the following template:
Note: Those who are already aware of loading a custom dataset can skip this section.
class CustomDataset : public torch::data::dataset<CustomDataset> {
private:
  // Declare 2 vectors of tensors for images and labels
  vector<torch::Tensor> images, labels;
public:
  // Constructor
  CustomDataset(vector<string> list_images, vector<string> list_labels) {
    images = process_images(list_images);
    labels = process_labels(list_labels);
  };

  // Override get() function to return tensor at location index
  torch::data::Example<> get(size_t index) override {
    torch::Tensor sample_img = images.at(index);
    torch::Tensor sample_label = labels.at(index);
    return {sample_img.clone(), sample_label.clone()};
  };

  // Return the length of data
  torch::optional<size_t> size() const override {
    return labels.size();
  };
};

int main(int argc, char** argv) {
  vector<string> list_images; // list of path of images
  vector<int> list_labels; // list of integer labels

  // Dataset init and apply transforms - None!
  auto custom_dataset = CustomDataset(list_images, list_labels).map(torch::data::transforms::Stack<>());
}
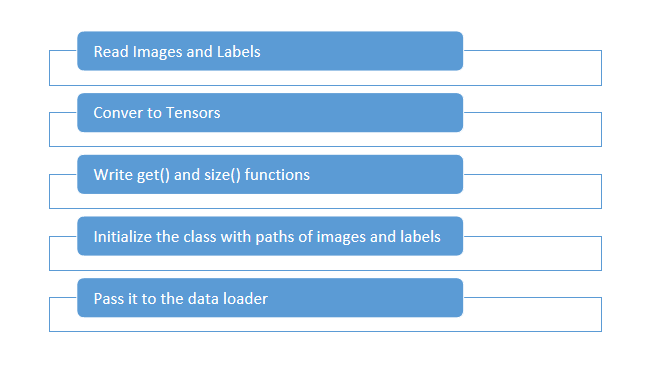
These were the steps we followed last time:
Overview: How to pass batches to our network?
Since we have our dataset loaded, let’s see how to pass batches of data to our network. Before we go on and see how PyTorch C++ API does it, let’s see how it’s done in Python.
dataset_loader = torch.utils.data.DataLoader(custom_dataset,
                                             batch_size=4, shuffle=True)
Just a short review of what DataLoader() class does: It loads the data and returns single or multiple iterators over the dataset. We pass in our object from Dataset class (here, custom_dataset). We will do the same process in C++ using the following template:
auto data_loader = torch::data::make_data_loader<torch::data::samplers::SequentialSampler>(
  std::move(custom_dataset),
  batch_size
);
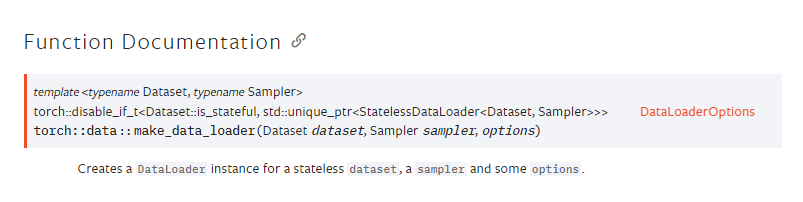
In brief, we are loading our data using SequentialSampler class which samples our data in the same order that we provided it with. Have a look at the SequentialSampler class here.
For the definition of this function: torch::data::make_data_loader here. A short screenshot from the documentation is given below.
Let’s go ahead and learn to iterate through our data loader and pass each batch of data and labels to our network. For once, imagine that we have a struct named Net which defines our network and forward() function which parses the data through each layer and returns the output.
for(auto& batch: *data_loader) {
  auto data = batch.data;
  auto target = batch.target.squeeze();
}
So we have retrieved our data and label (target) - which also depends on the batch size. If you have batch_size as 4 in the torch::data::make_data_loader() function, then size of the target and data will be 4.
Defining the Hyperparameters in Libtorch
Remember the Hyperparameters we need to define for training? Let’s take a quick review of what they are:
- Batch Size
- Optimizer
- Loss Function
We have used batch_size parameter above while making the data loader. For defining optimizer, we’ll go for Adam Optimizer here:
// We need to define the network first
auto net = std::make_shared<Net>();
torch::optim::Adam optimizer(net->parameters(), torch::optim::AdamOptions(1e-3));
Note that the PyTorch C++ API supports below listed optimizers:
As mentioned in the documentation of torch.optim package:
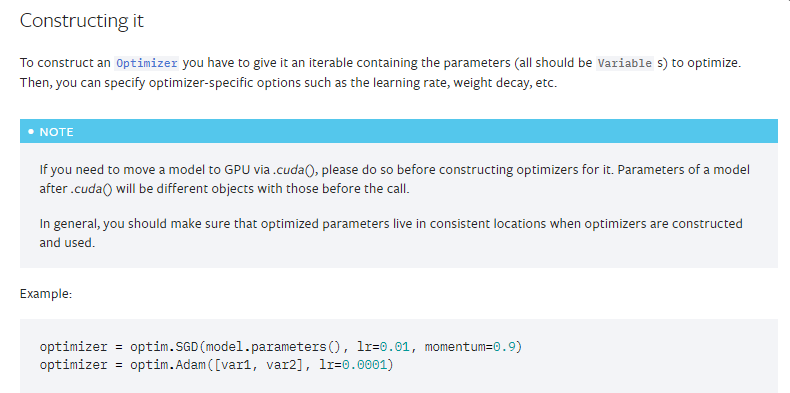
The documentation is self explanatory, so all we need to do is pass parameters of our Network which will be optimized using our optimizer, and pass in the learning rate like above. To know about parameters we can pass through AdamOptions, check out this documentation page.
Let’s go ahead and learn to define Loss Function in PyTorch C++ API. For an example, we’ll define nll_loss (Negative Log Likelihood Loss Function):
auto output = net->forward(data);
auto loss = torch::nll_loss(output, target);

// To backpropagate loss
loss.backward()
If you need to output the loss, use: loss.item<float>().
Training the Network
We are close to our last step! Training the network is almost similar to the way we do in Python. That’s why, I’ll include the code snippet here which should be self explanatory (since we have already discussed the core parts of it).
dataset_size = custom_dataset.size().value();
int n_epochs = 10; // Number of epochs

for(int epoch=1; epoch<=n_epochs; epoch++) {
  for(auto& batch: *data_loader) {
    auto data = batch.data;
    auto target = batch.target.squeeze();

    // Convert data to float32 format and target to Int64 format
    // Assuming you have labels as integers
    data = data.to(torch::kF2);
    target = target.to(torch::kInt64);

    // Clear the optimizer parameters
    optimizer.zero_grad();

    auto output = net->forward(data);
    auto loss = torch::nll_loss(output, target);

    // Backpropagate the loss
    loss.backward();
    // Update the parameters
    optimizer.step();

    cout << "Train Epoch: %d/%ld [%5ld/%5d] Loss: %.4f" << epoch << n_epochs << batch_index * batch.data.size(0) << dataset_size << loss.item<float>() << endl;
  }
}

// Save the model
torch::save(net, "best_model.pt");
In the next blog (coming soon), we’ll be discussing about Making Predictions using our network and will also show an example of training our network on a benchmark dataset.