Applying Transfer Learning on Dogs vs Cats Dataset (ResNet18) using PyTorch C++ API
Contents
Transfer Learning
– Before we go ahead and discuss the Why question of Transfer Learning, let’s have a look at What is Transfer Learning? Let’s have a look at the Notes from CS231n on Transfer Learning:
In practice, very few people train an entire Convolutional Network from scratch (with random initialization), because it is relatively rare to have a dataset of sufficient size. Instead, it is common to pretrain a ConvNet on a very large dataset (e.g. ImageNet, which contains 1.2 million images with 1000 categories), and then use the ConvNet either as an initialization or a fixed feature extractor for the task of interest.
![]()
There are 3 scenarios possible:
- When the data you have is similar (but not enough) to data trained on pre-trained model: Take an example of a pre-trained model trained on ImageNet dataset (containing 1000 classes). And the data we have has Dogs and Cats classes. Fortunate enough, ImageNet has some of the classes of Dog and Cat breeds and thus the model must have learned important features from the data. Let’s say we don’t have enough data but since the data is similar to the breeds in the ImageNet data set, we can simply use the ConvNet (except the last FC layer) to extract features from our dataset and train only the last Linear (FC) layer.
- When you have enough data (and is similar to the data trained with pre-trained model): Then you might go for fine tuning the weights of all the layers in the network. This is largely due to the reason that we know we won’t overfit because we have enough data.
- Using pre-trained models might just be enough if you have the data which matches the classes in the original data set.
Transfer Learning came into existence (the answer of Why Transfer Learning?) because of some major reasons, which include:
- Lack of resources or data set to train a CNN. At times, we either don’t have enough data or we don’t have enough resources to train a CNN from scratch.
- Random Initialization of weights vs Initialization of weights from the pre-trained model. Sometimes, it’s just better to initialize weights from the pre-trained model (as it must have learned the generic features from it’s data set) instead of randomly initializing the weights.
Setting up the data with PyTorch C++ API
At every stage, we will compare the Python and C++ codes to do the same thing, to make the analogy easier and understandable. Starting with setting up the data we have. Note that we do have enough data and it is also similar to the original data set of ImageNet, but since I don’t have enough resources to fine tune through the whole network, we perform Transfer Learning on the final FC layer only.
Starting with loading the dataset, as discussed in the blogs before, I’ll just post a flow chart of procedure.
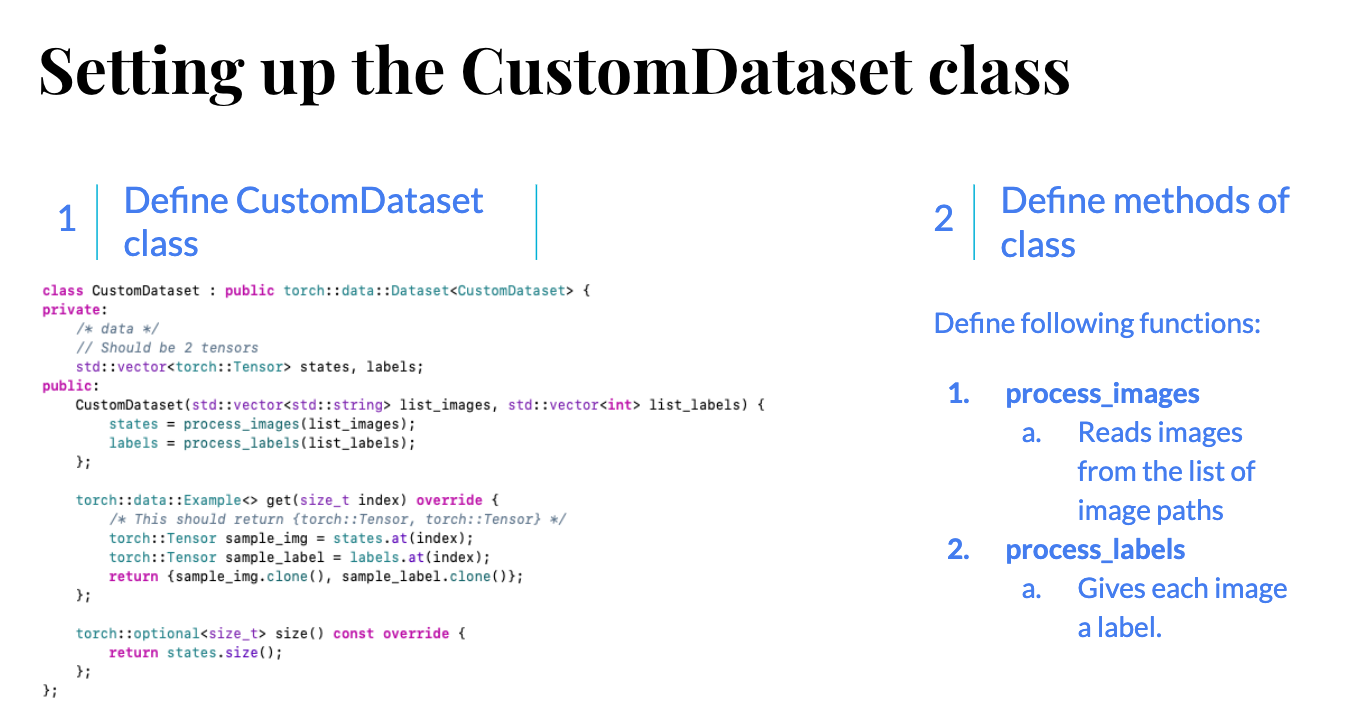
Once done, we can initialize the CustomDataset class:
C++
// List of images of Dogs and Cats, use load_data_from_folder function explained in previous blogs
std::vector<std::string> list_images;
// List of labels of the images
std::vector<int> list_labels;
auto custom_dataset = CustomDataset(list_images, list_labels).map(torch::data::transforms::Stack<>());
Python
from torchvision import datasets, transforms
import torch

folder_path = "/Users/krshrimali/Documents/dataset/train/"
transform = transforms.Compose([transforms.CenterCrop(224), transforms.ToTensor())
data = datasets.ImageFolder(root = os.path.join(folder_path), transform = transform)
We then use RandomSampler to make our data loader: (Note: it’s important to use RandomSampler as we load the images sequentially and we want mixture of images in each batch of data passed to the network in an epoch)
C++
int batch_size = 4;
auto data_loader = torch::data::make_data_loader<torch::data::samplers::RandomSampler>(std::move(custom_dataset), batch_size);
Python
batch_size = 4
data_loader = torch.utils.data.DataLoader(dataset=data, batch_size = batch_size, shuffle = True)
Loading the pre-trained model
The steps to load the pre-trained model and perform Transfer Learning are listed below:
- Download the pre-trained model of ResNet18.
- Load pre-trained model.
- Change output features of the final FC layer of the model loaded. (Number of classes would change from 1000 - ImageNet to 2 - Dogs vs Cats).
- Define optimizer on parameters from the final FC layer to be trained.
- Train the FC layer on Dogs vs Cats dataset.
- Save the model.
Let’s go step by step.
Step-1: Download the pre-trained model of ResNet18
Thanks to the developers, we do have C++ models available in torchvision (https://github.com/pytorch/vision/pull/728) but for this tutorial, transferring the pre- trained model from Python to C++ using torch.jit is a good idea, as most PyTorch models in the wild are written in Python right now, and people can use this tutorial to learn how to trace their Python model and transfer it to C++.
First we download the pre-trained model and save it in the form of torch.jit.trace format to our local drive.
# Reference: #TODO- Add Link
from torchvision import models
# Download and load the pre-trained model
model = models.resnet18(pretrained=True)

# Set upgrading the gradients to False
for param in model.parameters():
	param.requires_grad = False

# Save the model except the final FC Layer
resnet18 = torch.nn.Sequential(*list(resnet18.children())[:-1])

example_input = torch.rand(1, 3, 224, 224)
script_module = torch.jit.trace(resnet18, example_input)
script_module.save('resnet18_without_last_layer.pt')
We will be using resnet18_without_last_layer.pt model file as our pre-trained model for transfer learning.
Step-2: Load the pre-trained model
Let’s go ahead and load the pre-trained model using torch::jit module. Note that the reason we have converted torch.nn.Module to torch.jit.ScriptModule type, is because C++ API currently does not support loading Python torch.nn.Module models directly.
C++:
torch::jit::script::Module module;
// argv[1] should be the path to the model
module = torch::jit::load(argv[1]);

/* We need to convert last layer input and output features from (512, 1000) to (512, 2) since we only have 2 classes */
torch::nn::Linear linear_layer(512, 2);

// Define the optimizer on parameters of linear_layer with learning_rate = 1e-3
torch::optim::Adam optimizer(linear_layer->parameters(), torch::optim::AdamOptions(1e-3))
Python:
# We will directly load the torch.nn pre-trained model
model = models.resnet18(pretrained = True)

for param in model.parameters():
    param.requires_grad = False

model.fc = torch.nn.Linear(512, 2)
for param in model.fc.parameters():
	param.requires_grad = True

optimizer = torch.optim.Adam(model.fc.parameters())
cost = torch.nn.CrossEntropyLoss()
Trainining the FC Layer
Let’s first have a look at ResNet18 Network Architecture
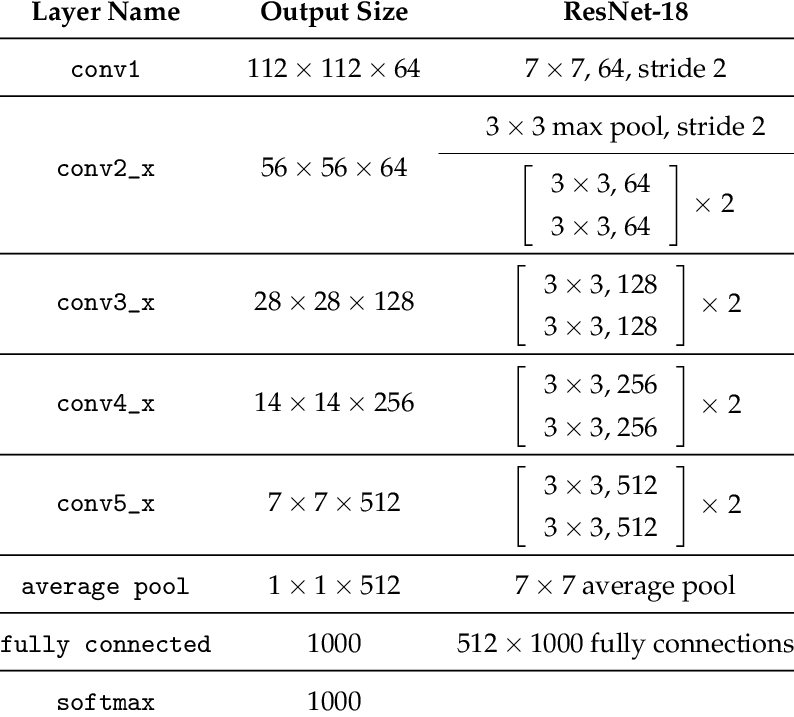
The final step is to train the Fully Connected layer that we inserted at the end of the network (linear_layer). This one should be pretty straight forward, let’s see how to do it.
C++:
void train(torch::jit::script::Module net, torch::nn::Linear lin, Dataloader& data_loader, torch::optim::Optimizer& optimizer, size_t dataset_size) {
    /*
     This function trains the network on our data loader using optimizer for given number of epochs.

     Parameters
     ==================
     torch::jit::script::Module net: Pre-trained model
     torch::nn::Linear lin: Linear layer
     DataLoader& data_loader: Training data loader
     torch::optim::Optimizer& optimizer: Optimizer like Adam, SGD etc.
     size_t dataset_size: Size of training dataset
     */

    float batch_index = 0;

    for(int i=0; i<15; i++) {
        float mse = 0;
        float Acc = 0.0;

        for(auto& batch: *data_loader) {
            auto data = batch.data;
            auto target = batch.target.squeeze();

            // Should be of length: batch_size
            data = data.to(torch::kF32);
            target = target.to(torch::kInt64);

            std::vector<torch::jit::IValue> input;
            input.push_back(data);
            optimizer.zero_grad();

            auto output = net.forward(input).toTensor();
            // For transfer learning
            output = output.view({output.size(0), -1});

            output = lin(output);
            // Explicitly calculate torch::log_softmax of output from the FC Layer
            auto loss = torch::nll_loss(torch::log_softmax(output, 1), target);

            loss.backward();
            optimizer.step();

            auto acc = output.argmax(1).eq(target).sum();

            Acc += acc.template item<float>();
            mse += loss.template item<float>();

            batch_index += 1;
        }

        mse = mse/float(batch_index); // Take mean of loss
        std::cout << "Epoch: " << i  << ", " << "Accuracy: " << Acc/dataset_size << ", " << "MSE: " << mse << std::endl;
        net.save("model.pt");
    }
}
Python:
n_epochs = 15

for epoch in range(n_epochs):
    mse = 0.0
    acc = 0
    batch_index = 0

    for data_batch in data_loader:
        batch_index += 1
        image, label = data_batch

        optimizer.zero_grad()

        output = model(image)
        _, predicted_label = torch.max(output.data, 1)

        loss = cost(output, label)

        loss.backward()
        optimizer.step()

        mse += loss.item() # data[0]
        acc += torch.sum(predicted_label == label.data)

    mse = mse/len(data)
    acc = 100*acc/len(data)

    print("Epoch: {}/{}, Loss: {:.4f}, Accuracy: {:.4f}".format(epoch+1, n_epochs, mse, acc))
The code to test should also not change much except the need of optimizer.
Results


On a set of 400 images for training data, the maximum training Accuracy I could achieve was 91.25% in just less than 15 epochs using PyTorch C++ API and 89.0% using Python. (Note that this doesn’t conclude superiority in terms of accuracy between any of the two backends - C++ or Python)
Let’s have a look at correct and wrong predictions.
Correct Predictions - Dogs
![]()
Wrong Predictions - Dogs
![]()
Correct Predictions - Cats
![]()
Wrong Predictions - Cats
![]()
Acknowledgements
I would like to thank a few people to help me bring this out to the community. Thanks to Piotr for his comments and answers in the PyTorch Discussion forum. Thanks to Will Feng for reviewing the blog and the code and also his constant motivation to bring this out to you all. Would like to thank my constant motivation behind all my work, Vishwesh Ravi Shrimali for all his help to start with PyTorch C++ API and help the community. Special thanks to Krutika Bapat as well, for reviewing the Python equivalent code and suggesting modifications.
And shout out to all the readers, please share your feedback with me in the comments below. I would love to hear if this blog helped you!
In the upcoming blog, I’ll be sharing something very exciting. Till then, happy learning!