Introduction to Xeus Cling
Today, we are going to run our C++ codes in the Jupyter Notebook. Sounds ambitious? Not much. Let’s see how we do it using Xeus Cling.

I’ll quote the definition of Xeus Cling on the official documentation website.
xeus-cling is a Jupyter kernel for C++ based on the C++ interpreter cling and the native implementation of the Jupyter protocol xeus.
Just like we use Python Kernel in the Jupyter Notebook, we can also use a C++ based interpreter cling combined with a Jupyter protocol called Xeus to reach closer to implementing C++ code in the notebook.
Installing Xeus Cling using Anaconda
It’s pretty straight forward to install Xeus Cling using Anaconda. I’m assuming the user has Anaconda installed. Use this command to install Xeus Cling using Anaconda: conda install -c conda-forge xeus-cling.
Note: Before using conda commands, you need to have it in your PATH variable. Use this command to add the path to conda to your system PATH variable: export PATH=~/anaconda3/bin/:$PATH.
The conventional way to install any such library which can create conflicts with existing libraries, is to create an environment and then install it in the environment.
- Create a
condaenvironment:conda create -n cpp-xeus-cling. - Activate the environment you just created:
source activate cpp-xeus-cling. - Install
xeus-clingusingconda:conda install -c conda-forge xeus-cling.
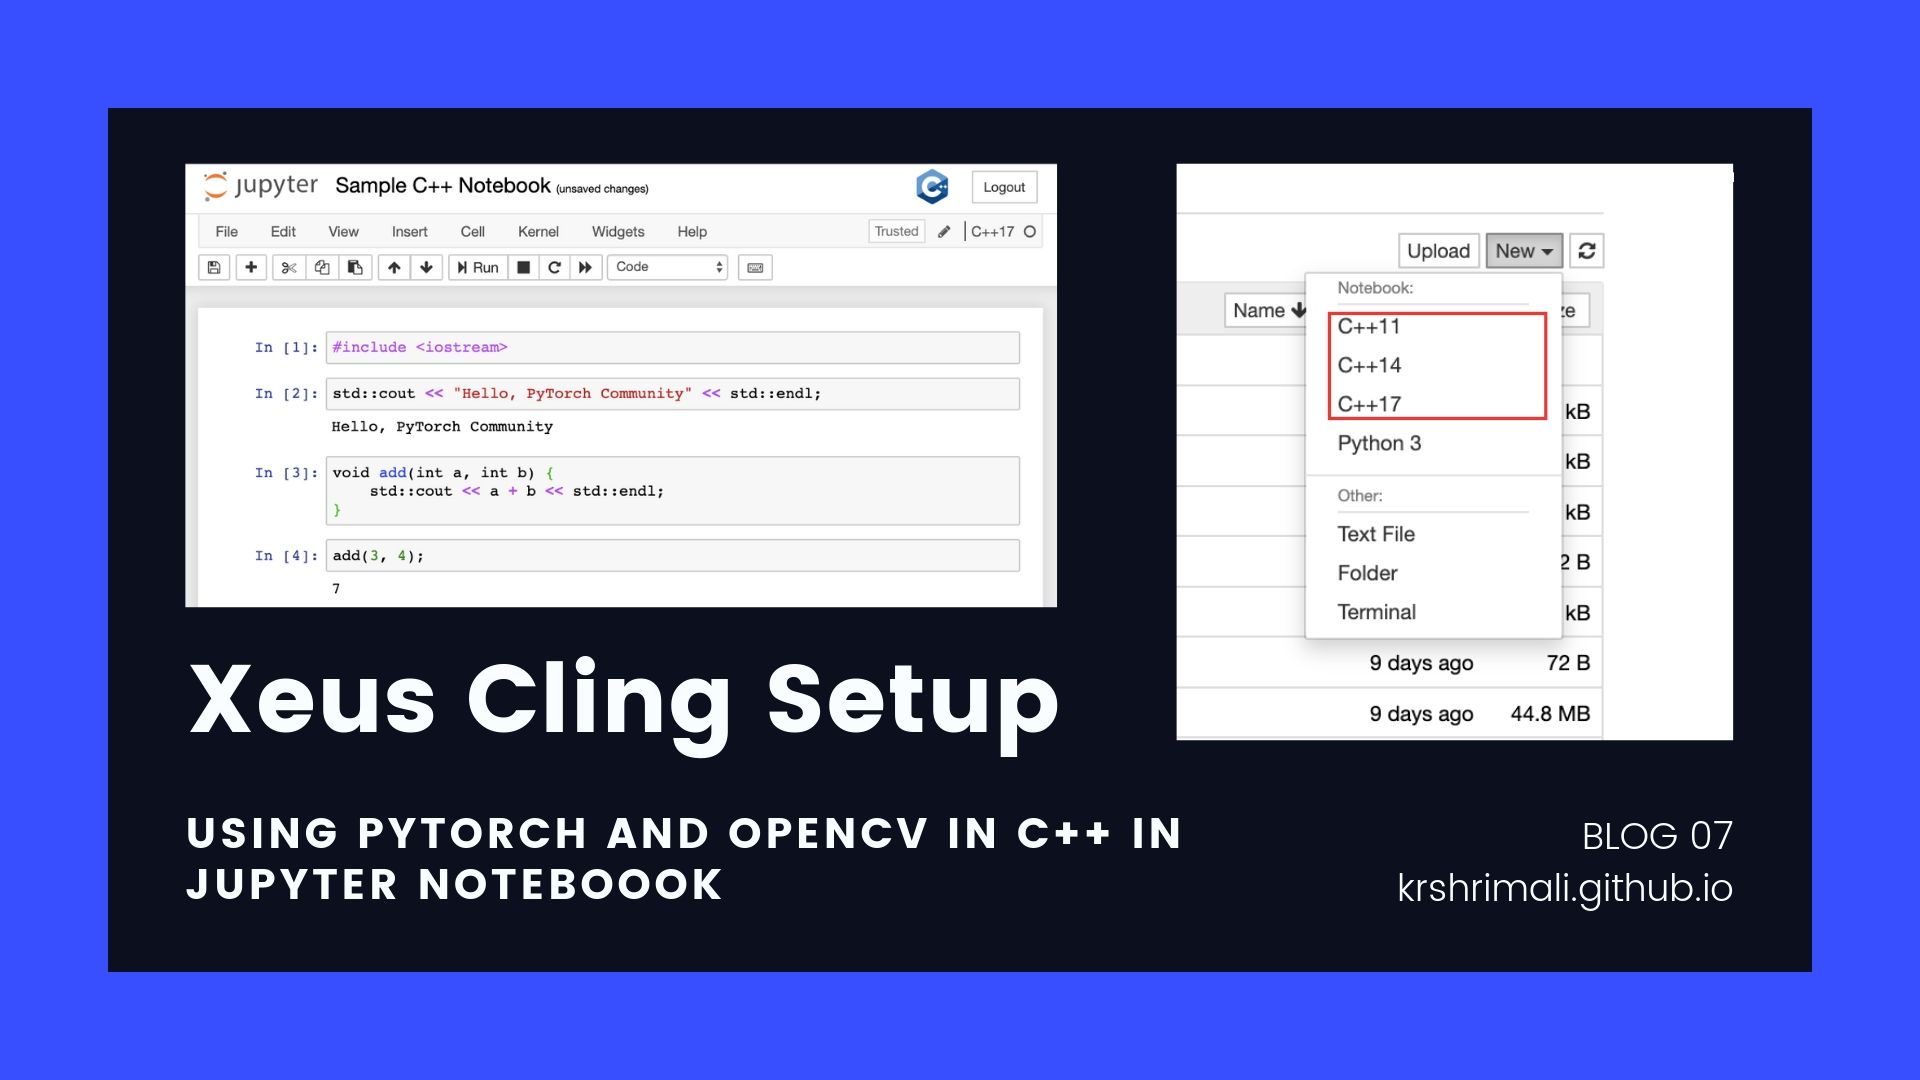
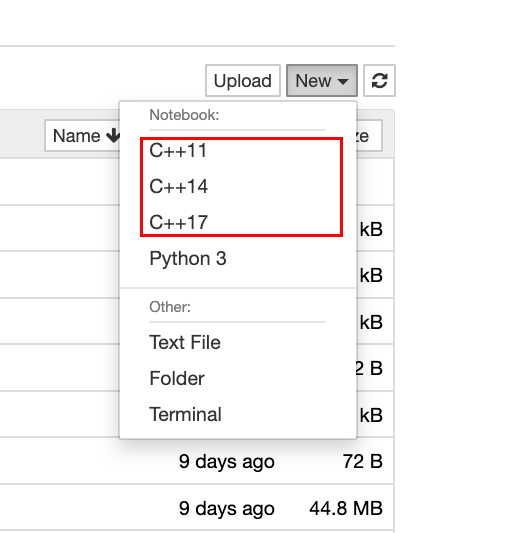
Once setup, let’s go ahead and get started with Jupyter Notebook. When creating a new notebook, you will see different options for the kernel. One of them would be C++XX where XX is the C++ version.

Click on any of the kernel for C++ and let’s start setting up environment for PyTorch C++ API.
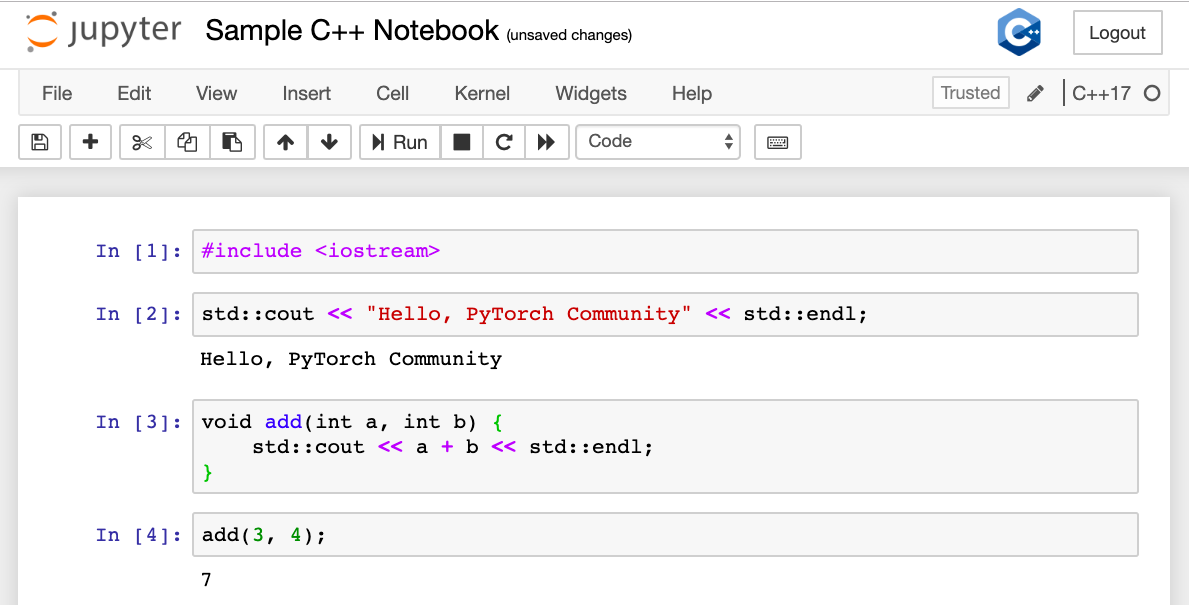
You can try and implement some of the basic commands in C++.

This looks great, right? Let’s go ahead and set up the Deep Learning environment.
Setting up Libtorch in Xeus Cling
Just like we need to give path to Libtorch libraries in CMakeLists.txt or while setting up XCode (for OS X users) or Visual Studio (for Windows Users), we will also load the libraries in Xeus Cling.
We will first give the include_path of Header files and library_path for the libraries. We will also do the same for OpenCV as we need it to load images.
#pragma cling add_library_path("/Users/krshrimali/Downloads/libtorch/lib/")
#pragma cling add_include_path("/Users/krshrimali/Downloads/libtorch/include")
#pragma cling add_include_path("/Users/krshrimali/Downloads/libtorch/include/torch/csrc/api/include/")
#pragma cling add_library_path("/usr/local/Cellar/opencv/4.1.0_2/lib")
#pragma cling add_include_path("/usr/local/Cellar/opencv/4.1.0_2/include/opencv4")
For OS X, the libtorch libraries will be in the format of .dylib. Ignore the .a files as we only need to load the .dylib files. Similarly for Linux, load the libraries in .so format located in the lib/ folder.
For Mac
#pragma cling load("/Users/krshrimali/Downloads/libtorch/lib/libiomp5.dylib")
#pragma cling load("/Users/krshrimali/Downloads/libtorch/lib/libmklml.dylib")
#pragma cling load("/Users/krshrimali/Downloads/libtorch/lib/libc10.dylib")
#pragma cling load("/Users/krshrimali/Downloads/libtorch/lib/libtorch.dylib")
#pragma cling load("/Users/krshrimali/Downloads/libtorch/lib/libshm.dylib")
For Linux
#pragma cling load("/opt/libtorch/lib/libc10.so")
#pragma cling load("/opt/libtorch/lib/libgomp-4f651535.so.1")
#pragma cling load("/opt/libtorch/lib/libtorch.so")
For OpenCV, the list of libraries is long.
For Mac
#pragma cling load("/usr/local/Cellar/opencv/4.1.0_2/lib/libopencv_datasets.4.1.0.dylib")
#pragma cling load("/usr/local/Cellar/opencv/4.1.0_2/lib/libopencv_aruco.4.1.0.dylib")
#pragma cling load("/usr/local/Cellar/opencv/4.1.0_2/lib/libopencv_bgsegm.4.1.0.dylib")
#pragma cling load("/usr/local/Cellar/opencv/4.1.0_2/lib/libopencv_bioinspired.4.1.0.dylib")
#pragma cling load("/usr/local/Cellar/opencv/4.1.0_2/lib/libopencv_calib3d.4.1.0.dylib")
#pragma cling load("/usr/local/Cellar/opencv/4.1.0_2/lib/libopencv_ccalib.4.1.0.dylib")
#pragma cling load("/usr/local/Cellar/opencv/4.1.0_2/lib/libopencv_core.4.1.0.dylib")
#pragma cling load("/usr/local/Cellar/opencv/4.1.0_2/lib/libopencv_dnn_objdetect.4.1.0.dylib")
#pragma cling load("/usr/local/Cellar/opencv/4.1.0_2/lib/libopencv_dnn.4.1.0.dylib")
#pragma cling load("/usr/local/Cellar/opencv/4.1.0_2/lib/libopencv_dpm.4.1.0.dylib")
#pragma cling load("/usr/local/Cellar/opencv/4.1.0_2/lib/libopencv_face.4.1.0.dylib")
#pragma cling load("/usr/local/Cellar/opencv/4.1.0_2/lib/libopencv_features2d.4.1.0.dylib")
#pragma cling load("/usr/local/Cellar/opencv/4.1.0_2/lib/libopencv_flann.4.1.0.dylib")
#pragma cling load("/usr/local/Cellar/opencv/4.1.0_2/lib/libopencv_freetype.4.1.0.dylib")
#pragma cling load("/usr/local/Cellar/opencv/4.1.0_2/lib/libopencv_fuzzy.4.1.0.dylib")
#pragma cling load("/usr/local/Cellar/opencv/4.1.0_2/lib/libopencv_gapi.4.1.0.dylib")
#pragma cling load("/usr/local/Cellar/opencv/4.1.0_2/lib/libopencv_hfs.4.1.0.dylib")
#pragma cling load("/usr/local/Cellar/opencv/4.1.0_2/lib/libopencv_highgui.4.1.0.dylib")
#pragma cling load("/usr/local/Cellar/opencv/4.1.0_2/lib/libopencv_img_hash.4.1.0.dylib")
#pragma cling load("/usr/local/Cellar/opencv/4.1.0_2/lib/libopencv_imgcodecs.4.1.0.dylib")
#pragma cling load("/usr/local/Cellar/opencv/4.1.0_2/lib/libopencv_imgproc.4.1.0.dylib")
#pragma cling load("/usr/local/Cellar/opencv/4.1.0_2/lib/libopencv_line_descriptor.4.1.0.dylib")
#pragma cling load("/usr/local/Cellar/opencv/4.1.0_2/lib/libopencv_ml.4.1.0.dylib")
#pragma cling load("/usr/local/Cellar/opencv/4.1.0_2/lib/libopencv_objdetect.4.1.0.dylib")
#pragma cling load("/usr/local/Cellar/opencv/4.1.0_2/lib/libopencv_optflow.4.1.0.dylib")
#pragma cling load("/usr/local/Cellar/opencv/4.1.0_2/lib/libopencv_phase_unwrapping.4.1.0.dylib")
#pragma cling load("/usr/local/Cellar/opencv/4.1.0_2/lib/libopencv_photo.4.1.0.dylib")
#pragma cling load("/usr/local/Cellar/opencv/4.1.0_2/lib/libopencv_plot.4.1.0.dylib")
#pragma cling load("/usr/local/Cellar/opencv/4.1.0_2/lib/libopencv_quality.4.1.0.dylib")
#pragma cling load("/usr/local/Cellar/opencv/4.1.0_2/lib/libopencv_reg.4.1.0.dylib")
#pragma cling load("/usr/local/Cellar/opencv/4.1.0_2/lib/libopencv_rgbd.4.1.0.dylib")
#pragma cling load("/usr/local/Cellar/opencv/4.1.0_2/lib/libopencv_saliency.4.1.0.dylib")
#pragma cling load("/usr/local/Cellar/opencv/4.1.0_2/lib/libopencv_sfm.4.1.0.dylib")
#pragma cling load("/usr/local/Cellar/opencv/4.1.0_2/lib/libopencv_shape.4.1.0.dylib")
#pragma cling load("/usr/local/Cellar/opencv/4.1.0_2/lib/libopencv_stereo.4.1.0.dylib")
#pragma cling load("/usr/local/Cellar/opencv/4.1.0_2/lib/libopencv_stitching.4.1.0.dylib")
#pragma cling load("/usr/local/Cellar/opencv/4.1.0_2/lib/libopencv_structured_light.4.1.0.dylib")
#pragma cling load("/usr/local/Cellar/opencv/4.1.0_2/lib/libopencv_superres.4.1.0.dylib")
#pragma cling load("/usr/local/Cellar/opencv/4.1.0_2/lib/libopencv_surface_matching.4.1.0.dylib")
#pragma cling load("/usr/local/Cellar/opencv/4.1.0_2/lib/libopencv_text.4.1.0.dylib")
#pragma cling load("/usr/local/Cellar/opencv/4.1.0_2/lib/libopencv_tracking.4.1.0.dylib")
#pragma cling load("/usr/local/Cellar/opencv/4.1.0_2/lib/libopencv_video.4.1.0.dylib")
#pragma cling load("/usr/local/Cellar/opencv/4.1.0_2/lib/libopencv_videoio.4.1.0.dylib")
#pragma cling load("/usr/local/Cellar/opencv/4.1.0_2/lib/libopencv_videostab.4.1.0.dylib")
#pragma cling load("/usr/local/Cellar/opencv/4.1.0_2/lib/libopencv_xfeatures2d.4.1.0.dylib")
#pragma cling load("/usr/local/Cellar/opencv/4.1.0_2/lib/libopencv_ximgproc.4.1.0.dylib")
#pragma cling load("/usr/local/Cellar/opencv/4.1.0_2/lib/libopencv_xobjdetect.4.1.0.dylib")
#pragma cling load("/usr/local/Cellar/opencv/4.1.0_2/lib/libopencv_xphoto.4.1.0.dylib")
For Linux
#pragma cling load("/usr/local/lib/libopencv_aruco.so.4.1.0")
#pragma cling load("/usr/local/lib/libopencv_bgsegm.so.4.1.0")
#pragma cling load("/usr/local/lib/libopencv_bioinspired.so.4.1.0")
#pragma cling load("/usr/local/lib/libopencv_calib3d.so.4.1.0")
#pragma cling load("/usr/local/lib/libopencv_ccalib.so.4.1.0")
#pragma cling load("/usr/local/lib/libopencv_core.so.4.1.0")
#pragma cling load("/usr/local/lib/libopencv_datasets.so.4.1.0")
#pragma cling load("/usr/local/lib/libopencv_dnn_objdetect.so.4.1.0")
#pragma cling load("/usr/local/lib/libopencv_dnn.so.4.1.0")
#pragma cling load("/usr/local/lib/libopencv_dpm.so.4.1.0")
#pragma cling load("/usr/local/lib/libopencv_face.so.4.1.0")
#pragma cling load("/usr/local/lib/libopencv_features2d.so.4.1.0")
#pragma cling load("/usr/local/lib/libopencv_flann.so.4.1.0")
#pragma cling load("/usr/local/lib/libopencv_freetype.so.4.1.0")
#pragma cling load("/usr/local/lib/libopencv_fuzzy.so.4.1.0")
#pragma cling load("/usr/local/lib/libopencv_gapi.so.4.1.0")
#pragma cling load("/usr/local/lib/libopencv_hdf.so.4.1.0")
#pragma cling load("/usr/local/lib/libopencv_hfs.so.4.1.0")
#pragma cling load("/usr/local/lib/libopencv_highgui.so.4.1.0")
#pragma cling load("/usr/local/lib/libopencv_imgcodecs.so.4.1.0")
#pragma cling load("/usr/local/lib/libopencv_img_hash.so.4.1.0")
#pragma cling load("/usr/local/lib/libopencv_imgproc.so.4.1.0")
#pragma cling load("/usr/local/lib/libopencv_line_descriptor.so.4.1.0")
#pragma cling load("/usr/local/lib/libopencv_ml.so.4.1.0")
#pragma cling load("/usr/local/lib/libopencv_objdetect.so.4.1.0")
#pragma cling load("/usr/local/lib/libopencv_optflow.so.4.1.0")
#pragma cling load("/usr/local/lib/libopencv_phase_unwrapping.so.4.1.0")
#pragma cling load("/usr/local/lib/libopencv_photo.so.4.1.0")
#pragma cling load("/usr/local/lib/libopencv_plot.so.4.1.0")
#pragma cling load("/usr/local/lib/libopencv_reg.so.4.1.0")
#pragma cling load("/usr/local/lib/libopencv_rgbd.so.4.1.0")
#pragma cling load("/usr/local/lib/libopencv_saliency.so.4.1.0")
#pragma cling load("/usr/local/lib/libopencv_sfm.so.4.1.0")
#pragma cling load("/usr/local/lib/libopencv_shape.so.4.1.0")
#pragma cling load("/usr/local/lib/libopencv_stereo.so.4.1.0")
#pragma cling load("/usr/local/lib/libopencv_stitching.so.4.1.0")
#pragma cling load("/usr/local/lib/libopencv_structured_light.so.4.1.0")
#pragma cling load("/usr/local/lib/libopencv_superres.so.4.1.0")
#pragma cling load("/usr/local/lib/libopencv_surface_matching.so.4.1.0")
#pragma cling load("/usr/local/lib/libopencv_text.so.4.1.0")
#pragma cling load("/usr/local/lib/libopencv_tracking.so.4.1.0")
#pragma cling load("/usr/local/lib/libopencv_videoio.so.4.1.0")
#pragma cling load("/usr/local/lib/libopencv_video.so.4.1.0")
#pragma cling load("/usr/local/lib/libopencv_videostab.so.4.1.0")
#pragma cling load("/usr/local/lib/libopencv_xfeatures2d.so.4.1.0")
#pragma cling load("/usr/local/lib/libopencv_ximgproc.so.4.1.0")
#pragma cling load("/usr/local/lib/libopencv_xobjdetect.so.4.1.0")
#pragma cling load("/usr/local/lib/libopencv_xphoto.so.4.1.0")
Once done, run the cell and that’s it. We have successfully setup the environment for Libtorch and OpenCV.
Testing Xeus Cling Notebook
Let’s go ahead and include the libraries. I’ll be sharing the code snippets as well as the screenshots to make it easy for the readers to reproduce results.
#include <torch/torch.h>
#include <torch/script.h>
#include <iostream>
#include <dirent.h>
#include <opencv2/opencv.hpp>

After successfully importing libraries, we can define functions, write code and use the utilities Jupyter provides. Let’s start with playing with Tensors and the code snippets mentioned in the official PyTorch C++ Frontend Docs.
Starting with using ATen tensor library. We’ll create two tensors and add them together. ATen comes up with functionalities of mathematical operations on the Tensors.
#include <ATen/ATen.h>

at::Tensor a = at::ones({2, 2}, at::kInt);
at::Tensor b = at::randn({2, 2});
auto c = a + b.to(at::kInt);

std::cout << "a: " << a << std::endl;
std::cout << std::endl;
std::cout << "b: " << b << std::endl;
std::cout << std::endl;
std::cout << "c: " << c << std::endl;

One of the reasons why Xeus-Cling is useful is, that you can print the outputs of intermediate steps and debug. Let’s go ahead and experiment with Autograd system of PyTorch C++ API.
For those who don’t know, automatic differentiation is the most important function of Deep Learning algorithms to backpropagte the loss we calculate.
#include <torch/csrc/autograd/variable.h>
#include <torch/csrc/autograd/function.h>

torch::Tensor a_tensor = torch::ones({2, 2}, torch::requires_grad());
torch::Tensor b_tensor = torch::randn({2, 2});

std::cout << a_tensor << std::endl;
std::cout << b_tensor << std::endl;

auto c_tensor = a_tensor + b_tensor;
c_tensor.backward(); // a.grad() will now hold the gradient of c w.r.t a

std::cout << c_tensor << std::endl;


How about debugging? As you can see in the figure below, I get an error stating no member named 'size' in namespace 'cv'. This is because namespace cv has member called Size and not size.
torch::Tensor read_images(std::string location) {
	cv::Mat img = cv::imread(location, 1);
	cv::resize(img, img, cv::size(224, 224), cv::INTER_CUBIC);
	torch::Tensor img_tensor = torch::from_blob(img.data, {img.rows, img.cols, 3}, torch::kByte);
	img_tensor = img_tensor.permute({2, 0, 1});
	return img_tensor.clone();
}

To solve, we can simply change the member from size to Size. One important point to consider is, that since this works on the top of Jupyter Interface, so whenever you re-run a cell, the variable names need to be changed as it will return an error of re-defining the variables which have already been defined.
For testing, I have implemented Transfer Learning example that we discussed in the previous blog. This comes handy as I don’t need to load the dataset again and again.

Bonus!
With this blog, I’m also happy to share a Notebook file with implementation of Transfer Learning using ResNet18 Model on Dogs vs Cats Dataset. Additionally, I’m elated to open source the code for Transfer Learning using ResNet18 Model using PyTorch C++ API.
The source code and the notebook file can be found here.
Debugging - OSX Systems
In case of OSX Systems, if you see any errors similar to: You are probably missing the definition of <function_name>, then try any (or all) of the following points:
- Use
Xeus-Clingon a virtual environment as this might be because of conflicts with the existing libraries. - Although, OSX Systems shouldn’t have
C++ ABI CompatabilityIssues but you can still try this if problem persists.- Go to
TorchCONFIG.cmakefile (it should be present in<torch_folder>/share/cmake/Torch/). - Change
set(TORCH_CXX_FLAGS "-D_GLIBCXX_USE_CXX11_ABI=")toset(TORCH_CXX_FLAGS "-D_GLIBCXX_USE_CXX11_ABI=1")and reload the libraries and header files.
- Go to