Today, I am elated to share Docker image for OpenCV, Libtorch and Xeus-Cling. We’ll discuss how to use the dockerfile and binder.
Before I move on, the credits for creating and maintaining Docker image goes to Vishwesh Ravi Shrimali. He has been working on some cool stuff, please do get in touch with him if you’re interested to know.
First question in your mind would be, Why use Docker or Binder? The answer to it lies in the frequency of queries on the discussion forum of PyTorch and Stackoverflow on Installation of Libtorch with OpenCV in Windows/Linux/OSX. I’ve had nightmares setting up the Windows system myself for Libtorch and nothing could be better than using Docker. Read on, to know why.
Installing Docker on Mac OS
To install docker (community edition - CE) desktop in Mac OS system, simply navigate to the Stable Channel section here. Once setup, you can use docker (command line and desktop). Once done, navigate to Install and run Docker for Mac section and get used to the commands.
Installing Docker on Ubuntu
Before moving on, please consider reading the requirements to install Docker Community Edition](https://docs.docker.com/v17.12/install/linux/docker-ce/ubuntu/). For the steps to install Docker CE, refer this.
Installing Docker on Windows
To install Docker on Windows, download docker (stable channel) from here. The installation steps to install Docker Desktop on Windows can be found here.
Using Docker Image
- Fetch the docker image:
docker pull vishwesh5/libtorch-opencv:opencv-4-1-0. This shall take a lot of time, so sit back and relax. - Run:
docker run -p 5000:5000 -p 8888:8888 -it vishwesh5/libtorch-opencv:opencv-4-1-0 /bin/bash.
To know more about these commands, check out the references section.
Once done, you’ll see your terminal showing another username: jovyan. You’ve entered the docker image, congratulations! No need to setup OpenCV or Libtorch. Vishwesh has done it for you!
Now since you have entered the docker container successfully, it should look something similar to this:

Time to test Libtorch. Let’s go ahead and test a simple VGG-Net on MNIST dataset using Libtorch.
Testing Docker Image
- Clone the repository containing code for Digit Classification using Libtorch on MNIST dataset:
git clone https://github.com/krshrimali/Digit-Recognition-MNIST-SVHN-PyTorch-CPP.git. Change directory to the cloned repository. - Download the MNIST data from http://yann.lecun.com/exdb/mnist/. Download
train-images-idx3-ubyte.gzandtrain-labels-idx1-ubyte.gzfiles for training the VGG-Net. You can skip downloading the test data for now. Usegunzip <file_path>to extract the training images and labels, and put them in thedata/folder inside the clones repository. - Create a
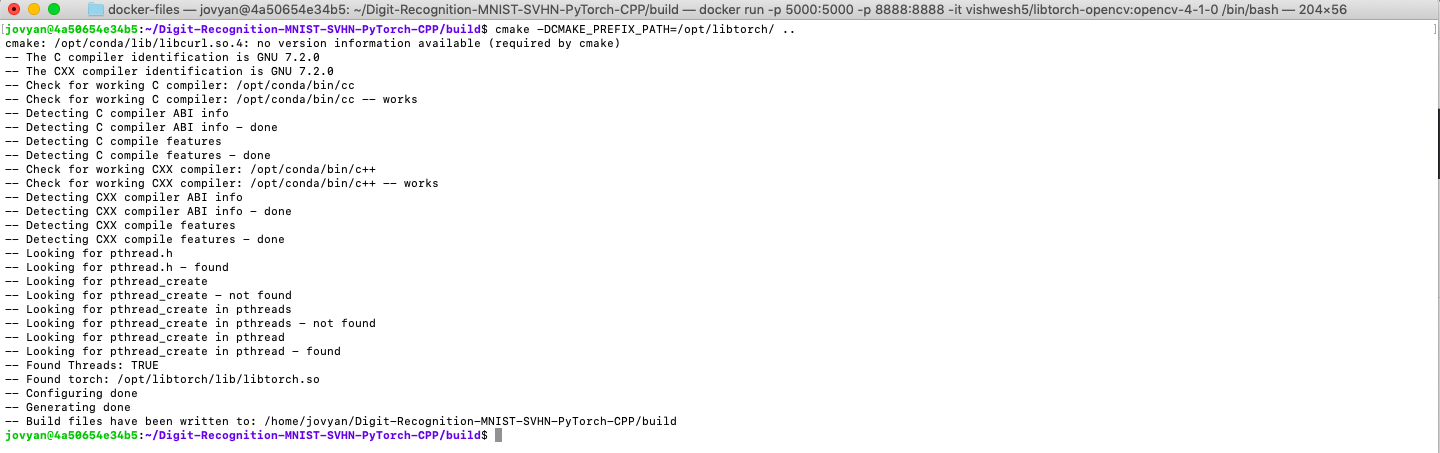
buildfolder:mkdir build - Run the CMake Configuration using:
cmake -DCMAKE_PREFIX_PATH=/opt/libtorch ... The result should be similar to something in the figure below. - Build the code using
makecommand:make. - Execute the code, and that’s it. Have fun learning.
Testing Docker Image with Xeus-Cling
Let’s test the Docker Image with Xeus-Cling.
- Run
jupyter notebookcommand in the console and copy the token from the url provided. - Open
http://localhost:8888in your browser. Note that the port address (8888) comes from-p 8888:8888in thedocker runcommand. You can change that if you want. Enter the token when asked. - Start a new notebook using
C++XXkernel. - Include and load libraries in the first cell using:
#include "includeLibraries.h". This should do all the stuff for you. - Start doing experiments using Xeus-Cling now.
Using Binder
And! What if you just want to try Libtorch or show it to the students? What if you are on a remote PC, and can’t install Docker? Well, here is the Binder: https://mybinder.org/v2/gh/vishwesh5/torch-binder/master.
Go to the above link and a notebook shall open.
Create a new notebook and start with: #include "includeLibraries.h" first and then start testing.
Acknowledgements
Thanks to Vishwesh Ravi Shrimali, for creating the docker container and binder for this post.